


 |


"There are two ways of spreading light: to be
The candle or the mirror that reflects it."
-- Edith Wharton, Vesalius in Zante
Theatre Lighting - A Brief History
As television is the descendant of the live stage, it is worth our while to have a look at the background of theatre lighting.
Gas Light
Philadelphia's Chestnut Street Theatre in 1816 became the first in the world to light the stage with gas. Gas provided brightness and control, but also unwanted heat, odour, and...fires, unfortunately. The limelight contained a lime filament that was the prototype of the spotlight. Invented in 1816 by Thomas Drummond, it produced a brilliant yet mellow white light.
|
Electric Incandescent Light
During the 1840s many experiments aimed at the development of a workable electrical incandescent lamp were conducted. Nothing practical happened until 1879, when Thomas Edison developed a successful carbon filament incandescent lamp. Carbonized threads were tightly sealed inside a glass bulb from which all air had been removed by vacuum pumps. The voltage was then steadily increased until the white heat (incandescence) reached a stable, bright glow. It lasted 40 hours.
|

Thomas Alva Edison
|
|
That invention marked the birth of both electric lighting and the electric age. Edison's obvious next step was to invent electric generators to supply his lamps with current. In 1882 his Pearl Street plant began serving 59 customers in the Wall Street district of Manhattan by supplying electric current for more than a thousand lamps.
Electricity was first used on a stage, illuminated by an electric-arc light, at the Paris Hippodrome in 1878; London's Savoy Theatre in 1881 became the first to use incandescent lamps. Electric light allowed more variety and control, and was the perfect complement to naturalistic staging, which developed at the same time.
|
Electric Fluorescent Lighting
Fluorescent light, first exhibited at the Chicago Centennial Exposition in 1933, came into popular use around 1939 and by 1950 had largely replaced incandescent lighting in schools, offices, hospitals, factories, and commercial establishments.
Fluorescent lamps emit more light per watt than incandescent bulbs. Their light is whiter than ordinary electric light, but if the chemicals in the interior phosphor coating are changed, different colours can be produced.
Fluorescent light belongs to the group of lighting devices known collectively as discharge tubes - glass tubes filled with metal vapour, with electrodes at each end. Electric current eventually ionizes the vapour, which begins to glow, producing light. Discharge tubes are widely used for street lighting. High pressure sodium vapour lamps produce a brilliant yellowish orange glow - they can be seen on the Don Valley Parkway in Toronto. Mercury vapour lamps, which operate at higher pressures, produce a greenish blue light. They are often enclosed in tubes coated with a fluorescent material that creates a shift toward warmer colours in the radiated light.
Measuring Light
Footcandles
|

|
A footcandle is roughly the amount of illumination on a surface one foot away from a common candle. (The metric equivalent of footcandles, lumens per square meter, may be obtained by multiplying the number of footcandles by 10.763.) For many years lighting calculations for interiors were made to provide uniform illumination on working surfaces. Recommendations have ranged from 5 to 10 footcandles (!) in the 1920s to 100 and upward in the 1960s, with much higher levels over small areas for critical examination. |
Light Meters
|

Sekonic light meter (courtesy Sekonic)
|
We measure light in studios with a light meter or exposure meter. The original Weston type used a selenium photoelectric cell that produced an electric current proportional to lighting reaching it. This, in turn, was measured directly by a sensitive electric meter. Another type uses a cadmium sulphide photoconductive cell, which changes resistance with light level changes, and therefore causes a change in the current from a battery, being sent to the meter movement.
One of the more popular meters used is a Sekonic Studio Deluxe. It's been around for quite some time, and works like the Weston type, i.e. batteries are unnecessary. It has a direct reading footcandles scale, and is simple to operate. A button in the centre of the meter is depressed, allowing the pointer in the meter freedom of movement. When it's released, it locks the pointer and the meter can be read at your convenience. Light meters of this type are available for use in our studios.
Inverse Square Law
|
Perhaps you've heard of the inverse square law. If you have a light source that radiates uniformly in all directions (that part is important - a candle or a regular home incandescent bulb, for example), the light intensity will fall off as the "inverse square of the distance." An example will help.
If the intensity of a typical candle is 1 foot candle measured at a distance of 1 foot away from the flame, its intensity at 2 feet will be 1/4 of a footcandle (1/22). At 3 feet, the intensity will be 1/32 or 1/9 of a footcandle. And so on.
This principle doesn't hold for fixtures like fresnel spotlights, flashlights, laser beams or car headlights. These are all focused fixtures - the drop off is much less noticeable. This feature is known as the columnation of the light source (how much the light is like a column). The best columnated source is a laser beam, which maintains its intensity over great distances.
|

The inverse square law: light intensity falls off as the "inverse square" of the distance (Courtesy http://www.cctv-information.co.uk)
|
Lighting Fixtures
Spotlights
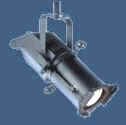
Fresnel
| The most popular spotlight is still the Fresnel, so named after Augustin Fresnel, who invented the tiered lens that it uses. The Fresnel spot is quite flexible, providing high light output and the ability to focus the beam in a flooded or spotted beam. Focusing can be done in a couple of different ways. One involves moving the bulb and back reflector unit by a turnscrew or quick sweep focus handle. The other is by moving the front lens instead of the hot lamp element - this is called a ring-focus spotlight. |

Fresnel spotlight (courtesy Strand)
|
Ellipsoidal
|
Ellipsoidal spotlight (courtesy Strand)
|
This is the hard-edged spotlight that creates clearly defined pools or circles of light. These circles can be modified by adjusting built-in shutters to create rectangles or triangles. Some ellipsoidal lights also can be used as pattern projectors by inserting a cookie (short for cucalorus - a metal pattern cutout) next to the shutters. These patterns can be placed in sharp or soft focus, creating a wide variety of effects. |

Some typical patterns for ellipsoidal projectors (courtesy Great American Pattern Company)
HMI
The Halogen-Metal-Iodide light is an arc-lamp Fresnel fixture. It delivers from three to five times the illumination of a quartz instrument of the same wattage, uses less power, and develops less heat. They come in a range from 200 to 4000 watts, and more. They are more expensive however, and each fixture needs a special starter-ballast unit to get it going. These boxes get warm and occasionally hum. They're unsuitable for ENG work or short turnaround situations, since they take a minute or two to build up to full illumination.
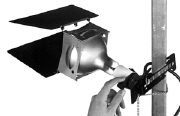
External Reflector
| These are small lightweight fixtures. The most familiar example of them are "redheads." They have no lens, and give a flat, even beam. When used in their focused position, the beam is not especially even - curiously, it is hotter around the edges, with a darker "hole" in the centre. This can be quickly remedied by simply spreading the beam a little. |

External reflector (courtesy Mole Richardson)
|
Internal Reflector
|
Photoflood (or internal reflector) spotlight (courtesy Lowel Light)
|
More commonly called a photoflood bulb, it's a self-contained, lower power fixture that screws into a standard light socket. This socket is usually attached to a wire clamp that can be conveniently clipped onto a chair, door, windowsill or small pole. This unit is also called a cliplight, and can even have attached to it a small set of barn doors. |
Floodlights
Scoop
| The scoop has no lens - just a large scoop-like reflector. The simplest, fixed-focus version has no controls at all, short of dimming the source or placing scrim material (spun glass fabric) in front of it. More versatile (quartz lamp) versions also have adjustable beams, from medium-spread to full flood. These are handy for filling in shadows in tighter areas. |

Scoop (courtesy Mole Richardson)
|
Broads and Softlights
|

Softlight (courtesy Mole Richardson)
|
These are versatile fixtures, providing very even lighting. Softlights have large, white reflecting surfaces to provide extremely diffused, even lighting. They are useful if you want to increase the basic light level without affecting your carefully controlled highlights and shadow areas.
Broads act like a series of scoops - they evenly light a large area with somewhat diffused light. Some broads have barn doors; others have adjustable beams, like quartz lamp scoops. You can attach an "egg crate" to the front of a broad - a multi-celled director that minimizes the amount of spill created by the broad.
|

Broad light (courtesy Mole Richardson)
|
Floodlight Banks, Strip or Cyc Lights
|

Floodlight bank (courtesy Mole Richardson)
|
Floodlight banks are high-intensity reflector bulbs mounted in a six, nine, or twelve spot arrangement. They are used mostly on remotes or outdoors, to illuminate large areas over a long distance or to act as a booster to reduce harsh daylight shadows.
Strip, or cyc lights are used to achieve even illumination of large set areas, such as the cyclorama or other uninterrupted background area. You can use them on the studio floor or suspend them in the grid. They are also used for silhouette lighting, where the background must be evenly illuminated, and the foreground must remain unlit.
|

Strip or cyclorama light (courtesy Mole Richardson)
|
Fluorescent Lights
|

Modern fluorescent light bank (courtesy KinoFlo)
|
A fluorescent light is a highly efficient light source that uses a mercury arc and a fluorescent phosphor coating inside its tube. The mercury arc in a fluorescent lamp operates between two heated coils called cathodes. Much of the arc's energy is emitted in the invisible ultraviolet range, but the phosphor coating in the tube converts it to visible wavelengths. Different phosphors can produce a range of colours varying from cool to warm. Strictly speaking, they�re a soft light, but at close range can be used as a harder type of illumination. |
|
The advantages of a fluorescent light are its high light output per watt and its long life. A 40-watt fluorescent lamp produces more than 70 lumens per watt, and lasts 15,000 to 20,000 hours, depending on the burning cycle. By contrast, your average tungsten studio bulb only lasts for about 250 hours and produces 25 lumens per watt. A domestic 40-watt incandescent lamp produces only 12 lumens per watt but has a rated average life of 1,500 hours.
There was a time when fluorescent lamps lacked the flexibility of incandescent lamps in that the wattage couldn�t be changed, nor could they be dimmed. That�s changed dramatically over the past few years with a number of manufacturers like Kino-Flo and Videssence making products that, while still soft in character, allow on-air talent (for example, in news programs) to keep their cool while under the no-longer hot lights of the set. New fluorescent tubes are being manufactured as "tri-phosphor", meaning they have red, green, and blue phosphor compounds that glow to produce light similar in colour rendering to regular illumination. The final drawback of fluorescent light - that it flickered noticeably on camera - has also been overcome by use of high-speed switching power supplies. The lights still flicker, but their pulsing rate is much higher than television or film frame rates. As well, fluorescents can now be dimmed using these same high-speed switching systems.
|

Miniature fluorescent light (courtesy KinoFlo)
|
Electroluminescence
|

Electroluminescent panels (courtesy Cool-Lux)
|
Electroluminescence was discovered decades ago, but has only recently been put to use in the broadcast lighting environment. EL panels are a "sandwich" of two layers of laminating film (the "bread"), two thin conductive films (one of them transparent to let light out), and the phosphorous compound itself (the "filling"). The panel gets brighter with an increase in the frequency of the applied voltage (up to a maximum of 5 KHz) as well as the voltage.The panels can be glued to walls, attached with Velcro and nailed and stapled to sets. It can be cut with scissors. It cannot electrocute talent, and radiates almost no heat. The technology consumes very low power (a 9 volt battery could power a 1 metre by 5 mm strip for a week, continuously.) The light colour temperatures available are sky blue or white. |
Mounting Lighting Equipment
|
Studio lights are usually hung from either fixed pipe grids or counterweighted pipe battens that can be lowered and raised to convenient positions. They are fixed to these pipes by C-clamps, or pantographs (spring-counterbalanced scissor-like devices).
Lights also can be mounted on floor stands - portable or otherwise. These can support any type of lighting instrument and can be vertically adjusted to most any height.
|

Various C-clamps (courtesy )
|
Lighting Control
Barn Doors
This simple but effective control is useful if you want to block certain areas from illumination. They are also used to prevent the back light from shining into the camera lens. Because barns doors slide into their fixtures easily, they also slip out of their fixtures easily. Ensure that they are safety chained to the light. When adjusting them, wear gloves - the black surfaces get very hot.
Flags
|

Various flags (courtesy )
|
These are rectangular frames with stretched cloth, or all-metal sheets of various sizes. They can be put anywhere on the set where you want to block light, and are mounted on flexible arms to allow complete freedom of adjustment. |
Reflectors
| Highly reflective sheets of white cardboard, metal or tin foil can be used to bounce light back onto the scene. They can be used as a substitute for fill lights on remote or outdoor locations. Experimentation reveals their full potential. |

Using reflectors (courtesy ) |
Scrims
Scrims are spun-glass diffusion material that you place in front of floods or spots. They absorb a lot of light, but provide quick diffusion in a variety of situations. Scrim material comes in many densities.
Eggcrates

Eggcrates (courtesy ) |
These consist of several (or sometimes dozens) or rectangular boxes, which make the illumination from softlights directional (which would otherwise tend to throw their light in many directions.) |
Softboxes
| Sometimes called Chimeras (although that term is a registered trademark) these are large fabric boxes that attach on to the front of hard or soft light fixtures. Sometimes the softboxes are so large that the fixtures (or bare bulbs) fit entirely inside them. They allow an otherwise hard light fixture to be extremely soft and even. |

Softbox devices (courtesy Chimera) |
Dimmers

Modern lighting dimmer board (courtesy Strand) |
The most flexible intensity control is the dimmer. By allowing more or less current to flow to the lamp, it burns with a higher or lower intensity. They can be used for intensity control, quick illumination changes, colour changes (if various fixtures are equipped with coloured gels), and special effects lighting such as silhouettes, pools of light, and day/night changes.
Individual dimmer controls can be arranged so they have independent control over a fixture, or they can be grouped under the control of a submaster or master. This is much like the way audio consoles are arranged.
Lighting control systems also include either a hardware or software (computer controlled) patch panel, allowing various fixtures to be controlled by different dimmers, at the whim of the lighting operator (versus a given fixture always being hard-wired to a particular dimmer).
|
Television Studio Lighting
Why do we light people and objects with special fixtures in television? Obviously, we have to provide proper technical exposure for the camera, so we can get clear pictures with good contrast and depth of field. Aesthetically, we want to make the people and scenery appealing; indeed, sometimes we want to make a set look like more than it is, or to set a mood.
In general, furnishing good illumination involves far more than just providing a certain number of footcandles. Light can model objects or flatten them, reveal colours or distort them, provide a cheerful environment or a gloomy one. Glare can reduce visibility. In addition to calculating illumination, the lighting person must deal with these problems through the choice of a light source and the type and placement of fixture.
Basic Television Lighting Terms
When lighting people, we frequently refer to the key, fill and back lights.
The key light is the apparent principal source of directional illumination falling on our subject. It is generally adjusted to have the highest intensity and may be a "hard" or "soft" type of fixture.
The fill light is supplementary illumination used to reduce the shadows or contrast range, especially those produced by the key light. It, too, can be a "hard" or "soft" fixture.
The back light is for the illumination of the person from behind to produce a highlight along the outline of the individual; this sets the subject apart from the background. To create this effect, this light is usually a "hard" type of fixture.
High-key and low-key are two terms used to describe an overall lighting "look." High-key has predominantly high-intensity areas, with a background illumination that is similar in intensity to the subject. Low-key, on the other hand, has mostly lower light levels, with backgrounds even lower. The subject illumination may even be restricted to only certain areas of the individual. MuchMusic's lighting is often high-key; most soap operas are low-key.
Television's Limits: Contrast, Two-Dimensionality, Colour
Contrast
Below a certain light level, the camera gives us back no pictures. Above a certain level, we also have no pictures - everything's washed out. Between these extremes we have a ratio -some say 20:1, others 30:1. And we haven't even accounted for the home viewer placing their brightness and contrast controls in all sorts of settings. So, let's stick with 20:1 to allow for variations within the television system and in the home receiver. Practically speaking, what does this mean? As an example, if you have peak light levels at 250 footcandles, nothing you want visible should be below 12 footcandles, within the same shot (that is, no iris adjusting on the fly). This doesn't sound like a great limit, but we are talking about the extremes of the 20:1 ratio here. For best results, your visible scene information should not approach these limits.
Be aware of the general reflectance of the objects you're shooting. A highly reflecting object needs less light than a matte, light-absorbing surface.
Try to avoid extreme brightness contrasts in the same shot. If you are shooting a reflective object, place it on a lighter cloth, not velvet. This way you can limit the amount of light hitting your key object without making the cloth appear too dark and muddy.
Lighten shadows with fill lights. This will show off detail that otherwise would be hidden, and reduce contrast.
Television's limited contrast ratio is the reason that talent shouldn't wear a lot of pure white or black. A crisp white shirt or white mohair sweater (or, conversely, "black tie" or "Queen Street West" black attire) looks great on the street. However, it can be difficult to get skin tones right, and show off these clothes well, when viewed on television.
Depth
Because the television screen has only two dimensions, the third dimension, depth, must be created by illusion. This two-dimensional problem is why chromakeys so often look like paper cutouts - there are few or no clues about the depth of the objects or persons being keyed.
A proper control of light and shadow is essential to reveal the actual shape and form of three-dimensional objects, their position in space, and their relationship to one another. It is often the shadows that show the form and dimension of an object rather than the light. Lighting that emphasizes shadows can make a relatively smooth surface look richly textured; conversely, soft lighting can smooth rough surfaces.
The lighting of the set also must provide the illusion of depth by outlining performers and objects against the background. Back lights work best; high contrast ranges between these objects and the background also are effective.
Colour
|
Colour temperature is the standard by which we measure the relative reddishness or bluishness of "white" light. Candles give off warm light; daylight gives off a "colder" light. This difference can be measured in degrees Kelvin.
The standard colour temperature for television lighting is 3200 degrees Kelvin (K) - fairly white with just a little warm tinge. All studio lights are rated for this colouration. Some fixtures designed to add to outdoor lighting, however, are balanced for 5600 degrees.
When you dim a light fixture, either at work or at home, your eyes quickly adjust to its lower colour temperature. Colour cameras are not so forgiving; they don't adjust at all. Between applying 25% to 100% power to an incandescent fixture, the colour temperature will change � 150 degrees K. As a result of this phenomenon the argument persists that you should never dim a studio fixture. As it turns out you can, in fact dim a fixture by up to 10% without having the colour change become too noticeable. Not only does this reduce power consumption, but it just about doubles the life of your bulbs!
One interesting note about the new fluorescent fixtures and their dimming properties is that they do not change their colour temperature as they dim, because of the system used to reduce the light intensity of the tubes.
Notice particularly the vast changes within the first two hours after sunrise, and during sunset. Early morning and afternoon/evening shoots, take note.
|

Typical colour temperatures
|
What to do? If adverse lighting conditions are all you have to work with, make sure your white balance is accurate - do it as often as you feel necessary. In addition to this, you may need to use one of the built-in filters on the camera filter wheel. If you move from bright outdoors to tungsten indoors, change the wheel back. Some camerapeople do this on the fly, as they walk from one environment to the other. In "live" situations, this is entirely acceptable.
|

Gel material on a lighting cart (Courtesy )
|
Additionally, gel material can be glued to windows through which you shoot all the time; it comes in various ND (Neutral Density) ratings as well as colours for converting daylight to tungsten temperature. The inverse procedure to putting gel on windows is to colour correct your tungsten lighting to daylight using dichroic filters (or even standard blue gel). This does, however, cut down on already precious footcandles.
Gel material, of course, doesn�t just come in colour correction or neutral density selections - an entire range of colour is there for you to try out and have fun with!
|

Coloured gels (Courtesy Rosco)
|
Reality / Non-reality
We can create illusions by thinking about what reality looks like. Long shadows suggest late afternoon or early morning; bright light establishes "outdoors" environments. A periodic flashing light through venetian blinds means a seedy hotel and/or neighbourhood.
Likewise, we can create moods using similar techniques. Reflections of light dancing off of water can create calming effects. And of course, everyone's seen the "lighting from below" look of B-grade mystery films.
In a word - experiment!
Things To Think About
Controllable lighting has been with us for some time.
If you can control it, you should have a reliable means of measuring it.
More sophisticated lighting fixtures give us more control - know your fixtures, and what kinds of light they give out.
Know how to mount them and control their output.
Television has some limits - we can�t just show absolutely anything that our eyes can see. What are these limits?
Changes in colour temperature are all around us, but since our eye adapts so well, we don�t notice these...but television cameras do. Be aware of colour temperature, and how we can work with it to achieve our creative results.